Lua Scripting Tutorial, Part 2
Overview
In this tutorial, you will learn how to take an existing template created by another community member in Core and create a script that alters the template to perform an action when a player interacts with it.
Together, you will create something that brightens every room: a light switch.
When a player presses F while near the light switch, it will flip and either turn on or off the light. It will simulate an electric current to the bulb.
Setting Up the Template
Download the Template
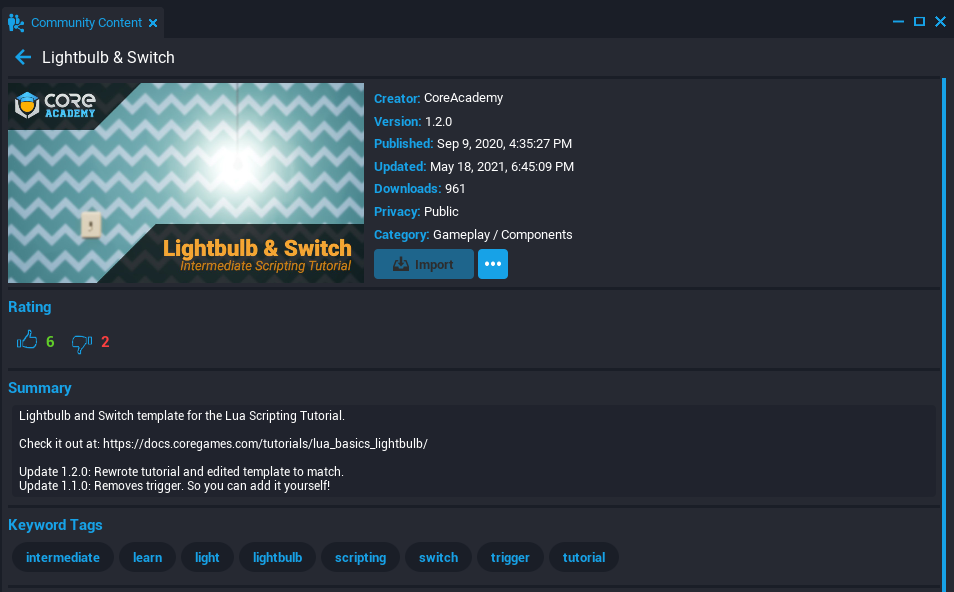
- Open the Community Content window in the Core Editor.
- In the search bar of the window, search
switchand find Lightbulb & Switch by CoreAcademy. - Click Import to download the template into your project.
Open the Template
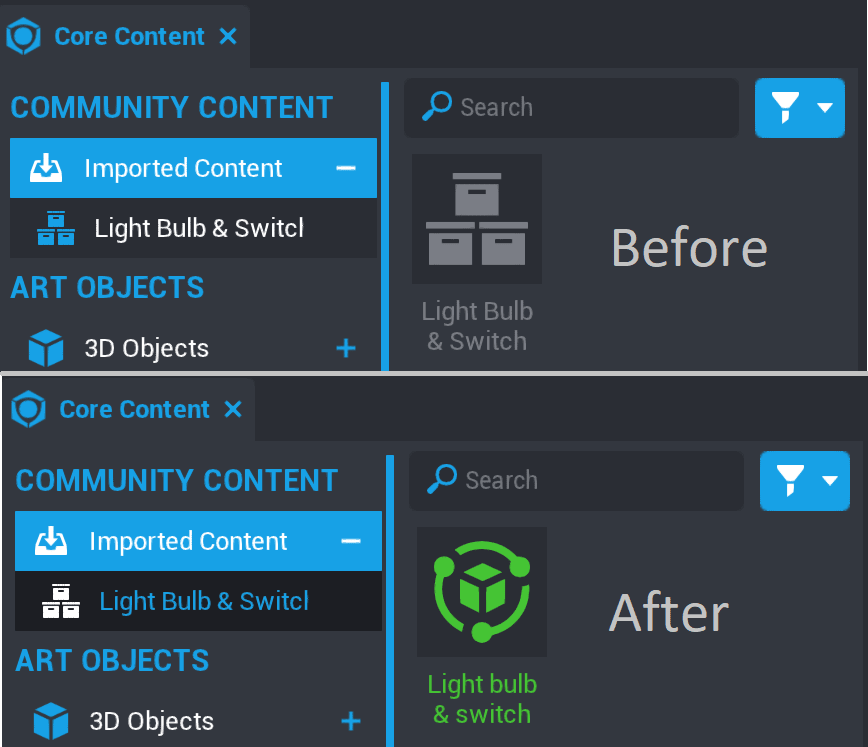
- In the Core Content window, find the Imported Content section then find Light Bulb & Switch
 .
. - Double-click the
 icon to open it. You should now see the green
  icon.
icon.
Add Template to Project
- Hold left-click on the Light Bulb & Switch package icon and drag it into your project by either dragging it into the Main Viewport somewhere in your world or dragging it into your Hierarchy.
- Make sure Selection Mode is set to Group so you select the entire template when clicking on it in the Main Viewport. You can use the C key to switch between Group Selection Mode and Object Selection Mode.
- Change the position of the template and its components where you want it using the transform tools in the top toolbar. To learn more about moving objects, check out the Intro to the Editor tutorial.
Note
If you click on the wall, or part of the scene, this will select the entire template. Click the group in the Hierarchy you want to move, resize, or rotate.
Deinstance the Lightbulb & Switch Template
To make changes to the template, you first need to Deinstance it.
Right click on the Lightbulb & Switch template in the Hierarchy and click Deinstance This Object.
The template and the objects in the template will change from blue to teal. This color change means that the template can now be edited.
Info
Deinstancing allows you to make changes to a particular copy of a template without changing the template itself. You can learn more about how this works in our Template Reference.
Create and Add a New Script
- To get started making this light switch work, you are going to create a new script by clicking the
 Create Script button in the toolbar at the top of the editor.
 - Name this script whatever you want; you will be using
LightSwitchToggle. - Save the script by pressing Ctrl+S.
- Open the contents of the Lightbulb & Switch template by clicking the drop down arrow to the left of its name in the Hierarchy.
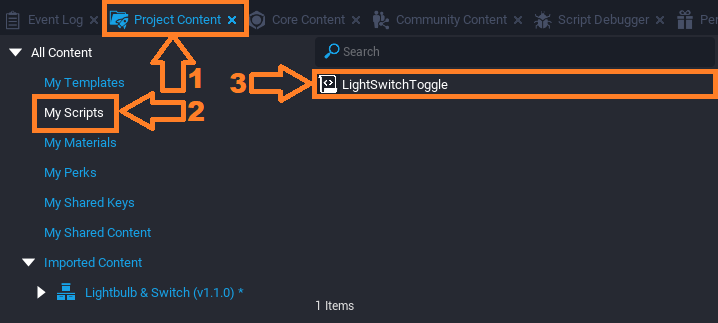
- Open the Project Content window and open the My Scripts category. Drag the
LightSwitchTogglefrom Project Content > My Scripts into the Lightbulb & Switch template group.
Info
It is important to save your scripts often so you don't lose work in the event of a problem. Use Ctrl+Shift+S to save all scripts and your entire project.
Create and Customize a Light
- Open the Lighting category of the Core Content window.
- Find the Point Light and drag it into the hierarchy, under Lightbulb & Switch > Lightbulb > Bulb.
- With the Point Light selected in the Hierarchy, open the Properties Window.
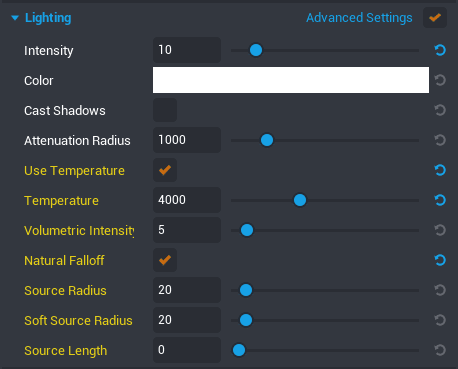
- Lower the Intensity property until the light looks natural in your scene.
- In the Lighting section of Properties, check the box next to Advanced Settings to see more options to customize the light.
- Check the box for Use Temperature, and lower the Temperature property to create a warm glow color to the light.
- Since you want the light to be off by default, set the Visibility property to Force Off.
- So that you are able to edit the light in the future through the script, enable networking by right-clicking the light in the Hierarchy then clicking Enable Networking.
Add a Trigger
To create in-game interactions in Core, use a Trigger. A trigger defines the area and checks if any player enters, leaves, or presses the interact key, F, near it.
You will be using this trigger for the purposes of allowing them to interact with the switch. When a player pressed F near the light switch, it will activate the trigger and flip the switch.
- Right-click the template and left-click Add Gameplay Object > Add Trigger.
- Move the trigger to overlap the switch.
- Resize the trigger to be the distance you want players to be able to interact with the switch.
- Right-click the trigger then left-click Enable Networking.
Hint
You also can add trigger objects to a project from the Core Content window, in the Gameplay Objects section.
Hint
If you can't see a the trigger, press V to make it visible.
Make the Trigger Interactable
- Look at the Properties window with the trigger selected. Under the Gameplay section there is a property called Interactable. Make sure the box is checked so players can interact with the trigger.
- Find the Interaction Label property, and change it to something like "Turn On"
- Press Play to start a preview, and walk up to the Light switch. You should see a message pop up in the middle of your screen.
Setting the Custom Properties
A very powerful feature of creating in Core is Custom Properties. They allow you to point reference to other objects in your game world or other data types. Data types include strings, numbers, booleans, etc.
Thinking ahead before you begin scripting, you need to decide what Custom Properties you need.
Being this is a lightbulb and switch, you know you will have to reference those two objects.
In order to be able to allow the player's interaction to cause the switch to flip and the light to turn on, you will also need a reference to the trigger you just customized above.
To add a custom property to the script, click on the script and then drag-and-drop the object you are referencing into the Custom section of the Properties window.
The Custom Properties section of the script should now look like this: 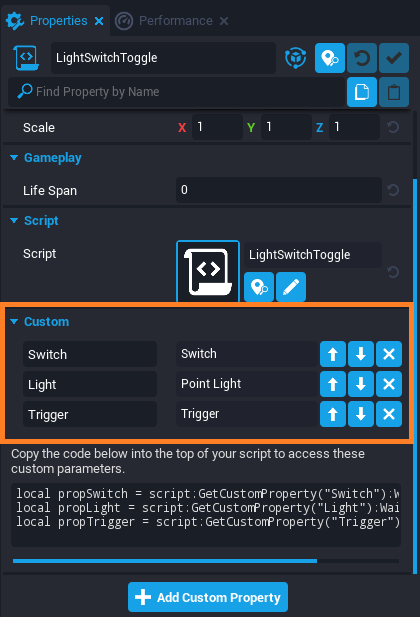
Scripting References to Custom Properties
Reference the Switch
You want our light switch to function just like a real one: the switch will point up or down depending on whether the light is turned on or off.
First you will need to tell the script which object in the scene is the switch, so that it knows what to rotate. You will create a variable that defines what the switch is.
To move the switch, you need a way to talk about the specific object from the game space in code.
Type the following into Line 1 of LightSwitchToggle:
local Switch = script:GetCustomProperty("Switch"):WaitForObject()
localis a keyword that indicates that you are making a variable. You use the termlocalhere because it will only be accessible from this script rather than being accessible from other scripts.Switchis the variable name. You can name it anything but it's important to create variables with self-explanatory names so our scripts are easy to read and understand.scriptrefers to the script itself as it exists in the project.GetCustomProperty(string name)is a function that gets a reference to the object in the Custom Property that you added in Setting the Custom Properties.WaitForObject()is a function of the Custom Property object you referenced that prevents the script from trying to find it before it has been loaded into the game.
Reference the Light
Since the switch will be turn on and off a light, you also need to add a reference of it into the script.
Type the following into the next line of LightSwitchToggle:
local Light = script:GetCustomProperty("Light"):WaitForObject()
Reference the Trigger
Finally, you need a reference to the trigger as this interaction is what will flip the switch and toggle the light.
Type the following into the next line of LightSwitchToggle:
local Trigger = script:GetCustomProperty("Trigger"):WaitForObject()
The script should now look like:
local Switch = script:GetCustomProperty("Switch"):WaitForObject()
local Light = script:GetCustomProperty("Light"):WaitForObject()
local Trigger = script:GetCustomProperty("Trigger"):WaitForObject()
Finding the Switch's Rotation
To figure out how to rotate the switch, you will rotate it around in game, and take note of the Rotation property displayed in the switch's Properties window.
Select the Switch
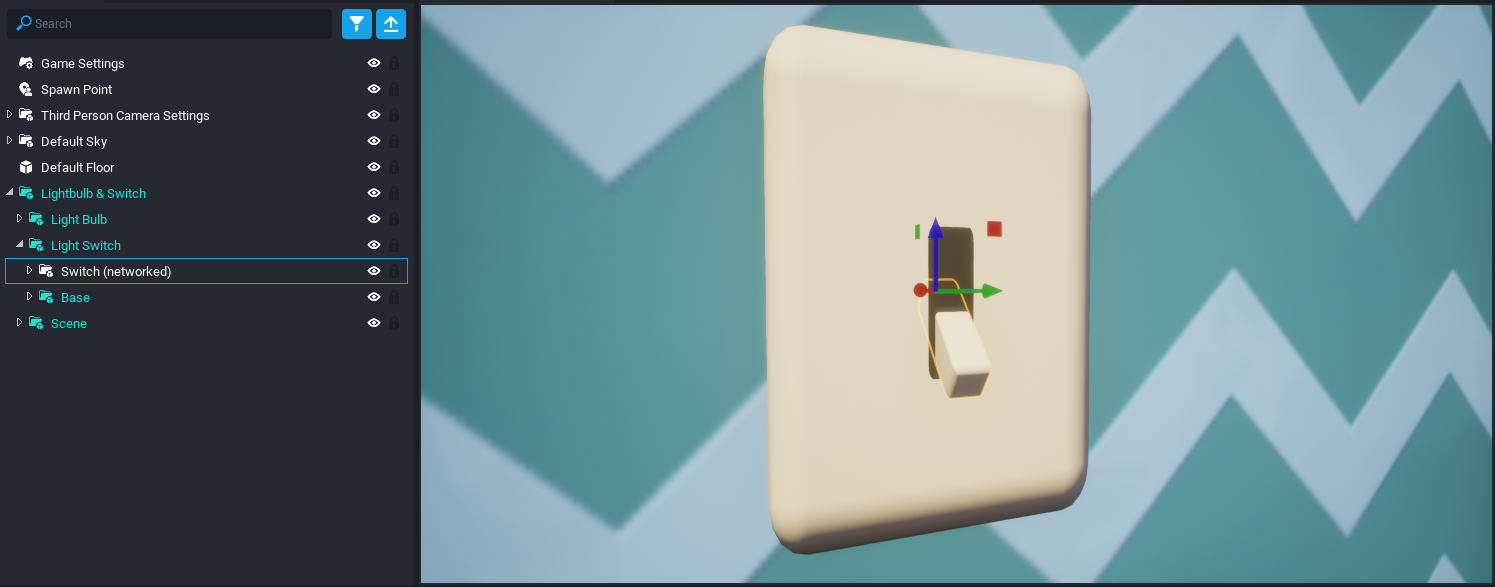
Click on the Switch (networked) group in the Hierarchy to select it. Note that you will need to select the entire group, not just the cube inside of it, because the entire group is what the Switch variable you defined earlier refers to.
Find the Switch's Current Rotation
Turn on Rotation mode by clicking the ![]() button, or pressing E
button, or pressing E
Info
The editor keyboard shortcuts, such that E switches to Rotation mode, can help productivity and speed while using the Core editor. Check out all the keybindings in our Editor Keybindings reference.
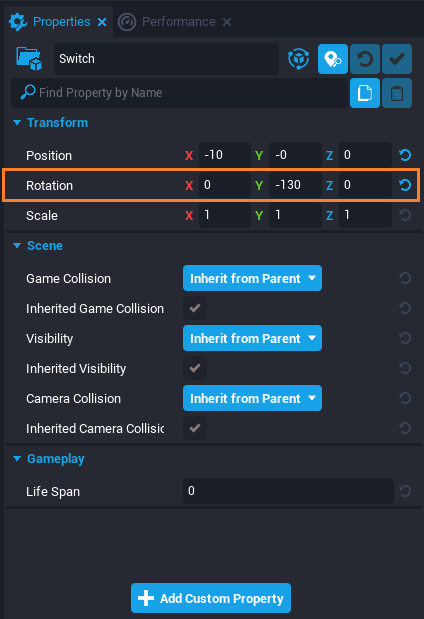
Look at the Properties window. In the Transform section. You should see a property called Rotation with an X, Y, and Z value.
Rotate the Switch in the Editor
To figure out where the switch needs to be for on/off state, you will reposition it using the Rotate tool and take note of final rotations that you want to change it to.
- Click the green ring on the Rotate tool to move the switch up and down, and take note of the change in the Y value of the switch's Rotation property.
- Press Ctrl+Z to return the switch to its original position.
Your rotations may be different, but will most likely look like this:
| On / Off | X | Y | Z |
|---|---|---|---|
| On | 0 | -60 | 0 |
| Off | 0 | -130 | 0 |
Scripting the Rotation
Create Variables for Each Rotation
Now that you know the rotations of the switch for "on" and "off", you can save them as variables. Variables that will not be altered throughout the script, like the on/off rotation variables here, are called constants. Constants are usually in CAPS_CASE, meaning all upper-case letters with _ between each word.On the next line of your LightSwitchToggle add these lines:
local ROTATION_ON = Rotation.New(0, -60, 0)
local ROTATION_OFF = Rotation.New(0, -130, 0)
Rotation.Newmeans you are telling the script to rotate our object to a new set of coordinates.(x, y, z)are the coordinates (respectively) of where you want our switch to rotate to. You want to rotate our switch up along the y-axis by 90 degrees.
Note
You will almost always use Rotation.New when rotating an object, but there is also a predefined Rotation called Rotation.ZERO which will rotate the object to 0, 0, 0. Learn more about Rotations on the Core API page.
Make the Switch Rotate with a Script
Next you will rotate the switch. On a new line, type:
local TIME_ROTATE = 2

Switch:RotateTo(ROTATION_ON, TIME_ROTATE)
Switchtells the script to rotate the object attached to this variable.RotateTo(rotation, time)is an function that tells Core you want to rotate an object.TIME_ROTATEis the time it should take to complete the rotation. Storing this as a variable makes it really easy to edit in the future.
The script should now look like this:
local Switch = script:GetCustomProperty("Switch"):WaitForObject()
local Light = script:GetCustomProperty("Light"):WaitForObject()
local Trigger = script:GetCustomProperty("Trigger"):WaitForObject()

local ROTATION_ON = Rotation.New(0, -60, 0)
local ROTATION_OFF = Rotation.New(0, -130, 0)
local TIME_ROTATE = 2

Switch:RotateTo(ROTATION_ON, TIME_ROTATE)
Tip
You define the time to rotate with a new variable as this makes it easier to edit in the future. It is best to avoid magic numbers whenever possible. Magic Numbers are direct usage of numbers in code, such as if you did Switch:RotateTo(Rotation.New(0, -60, 0), 2). If you did not define the time as a variable, it may be confusing when looking at the code later.
Test out the Switch
Let's press Play and see how our switch moves.
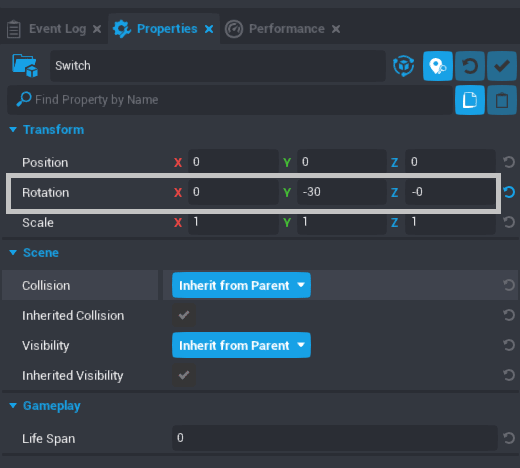
Unfortunately that didn't quite work out the way you wanted. Depending on where in the scene you placed your light switch, it might look like this image, where the switch rotated sideways instead of up.
Change the Rotation to Local Space
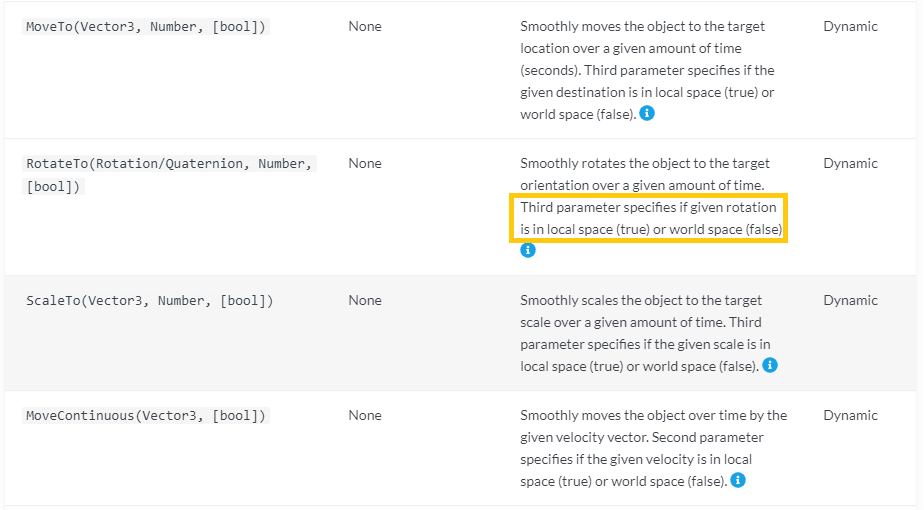
To get the script to rotate the switch the way you want, only along the y-axis, it needs to know to move relative to its original position. Luckily in this case the RotateTo() function has an optional parameter that you can add to specify that you want the rotation to happen relative to its own space.
Change the last line to look like this:
Switch:RotateTo(ROTATION_ON, TIME_ROTATE, true)
By adding true to the end of the parameters for RotateTo(), it moves in local space. If you were to enter false instead, or enter nothing like you did the first time, it will move in world space. World space is relative to nothing but the world itself, as if it was at the root of the Hierarchy.
Press Play and test it out.
Letting Players Move the Light Switch
So far, you have made a script that moves the light switch, but this happens automatically and immediately when the game starts. Next, you will make the players able to flip the switch to turn on and off our light.
Create a Function for the Trigger
Now that the script knows which object you are using as a trigger, you need to define what happens when you interact with the trigger.
After your rotation statement, type:
function OnTriggerInteracted()

end
- A
functionis a set of actions that the script carries out every time the function is referenced in the script. OnTriggerInteractedis the name of the function you are deciding to give it. You can name it anything, but the name chosen will make sense when you get into events later on.endtells the script the function is over.
This function will define what happens when the player interacts with the trigger.
Move the Switch Code into the Function
Eventually you want the switch to flip up and down when the player interacts with it, turning the light on and off. For now you will just place our rotate statement inside it, which is just the switch turning down.
Cut and paste the RotateTo statement into our OnTriggerInteracted function.
It should now look like this:
local Switch = script:GetCustomProperty("Switch"):WaitForObject()
local Light = script:GetCustomProperty("Light"):WaitForObject()
local Trigger = script:GetCustomProperty("Trigger"):WaitForObject()

local ROTATION_ON = Rotation.New(0, -60, 0)
local ROTATION_OFF = Rotation.New(0, -130, 0)
local TIME_ROTATE = 2

function OnTriggerInteracted()
    Switch:RotateTo(ROTATION_ON, TIME_ROTATE, true)
end
Connect the Function to an Event
Lastly, you will need an event statement that tells the script to do the OnTriggerInteracted function when the player interacts with the trigger. At the end of your script type:
Trigger.interactedEvent:Connect(OnTriggerInteracted)
Triggeris the variable name of this trigger.interactedEvent:Connect(function)tells the script every time the player interacts with trigger to execute the function passed to theConnect()function.OnTriggerInteractedis the name of the function you are connecting.
Without this statement the script will never call the OnSwitchInteraction function.
Test Out the Script
Your script should now look like this:
local Switch = script:GetCustomProperty("Switch"):WaitForObject()
local Light = script:GetCustomProperty("Light"):WaitForObject()
local Trigger = script:GetCustomProperty("Trigger"):WaitForObject()

local ROTATION_ON = Rotation.New(0, -60, 0)
local ROTATION_OFF = Rotation.New(0, -130, 0)
local TIME_ROTATE = 2

function OnTriggerInteracted()
    Switch:RotateTo(ROTATION_ON, TIME_ROTATE, true)
end

Trigger.interactedEvent:Connect(OnTriggerInteracted)
- Press Play to start a local preview.
- Walk up to the switch trigger and press F to interact with it. The switch should move up.
Note
Make sure that the trigger is Interactable if you do not see the option to press F pop up when you walk near it.
Speed Up the Movement
Now that the switch is working, you can speed up the rotation to look more like real light switch.
Change the 2 for the TIME_ROTATE variable to 0.1. Now the switch will complete its rotation in 0.1 seconds.
Press Play to test out the improved movement speed.
Best Practices: Organizing Your Code
Organized code is easily read and understood. Using clear variable and function names, and adding comments to explain the purpose of sections of code will make your code easier to use by you in the future and by anyone else working with your scripts.
Programmers use comments to define and explain certain parts of their code. Add comments to your code to make the purpose of each section clear.
-- References used when interacting with the scene objects
local Switch = script:GetCustomProperty("Switch"):WaitForObject()
local Light = script:GetCustomProperty("Light"):WaitForObject()
local Trigger = script:GetCustomProperty("Trigger"):WaitForObject()

-- Constants used when interacting with the scene objects
local ROTATION_ON = Rotation.New(0, -60, 0)
local ROTATION_OFF = Rotation.New(0, -130, 0)
local TIME_ROTATE = 0.1

-- Function to flip the switch
function OnTriggerInteracted()
    Switch:RotateTo(ROTATION_ON, TIME_ROTATE, true)
end

-- Connect the function to the trigger interacted event
Trigger.interactedEvent:Connect(OnTriggerInteracted)
As your scripts get longer, these practices will make them easier to read and edit.
Turning the Light On
Your next project goal is to make the switch more functional and have it turn on a light when players interact with it.
In the OnTriggerInteracted() function under our RotateTo() statement, type:
Light.visibility = Visibility.INHERIT
Lightis the object you are trying to alter.visibilityis the property you are trying to change.Visibilityis a set of possible values with options of visibility that an object can be:FORCE_ON,FORCE_OFF, orINHERIT.INHERITis a value of Visibility that means the object is visible if its parent is visible.
The OnTriggerInteracted function should look like:
function OnTriggerInteracted()
    Switch:RotateTo(ROTATION_ON, TIME_ROTATE, true)
    Light.visibility = Visibility.INHERIT
end
This will set the visibility of the light to be INHERIT. This means that if the bulb is visible, the light will also be visible. However, if the bulb is not visible, then the light will stay off.
Turning the Switch Off
Create a Boolean Variable
To turn the switch off again, you will create a variable that keeps track of whether the switch is on or off.
To do this, you can use a Boolean datatype. A Boolean has only two options: true, meaning "yes," or false, meaning "no".
Add this new variable to the top of your script, under the constants:
local isSwitchOn = false
isSwitchOnis the name of the variable you will use to keep track of the switch being on and off.falseis a type of data called a Boolean. The starting state for the switch is false, because the light starts out off.
Switch the Variable between True and False
Next, you need to tell the script to switch isSwitchOn from false to true, when you turn on the light.
At the top of the OnTriggerInteracted() function, type:
isSwitchOn = not isSwitchOn
Instead of just setting isSwitchOn to true, this tells the script to change isSwitchOn to the opposite of what it is already set to.
If isSwitchOn is false, it sets it to true, and vice versa. In other words, the value is toggled to the opposite state.
Test the Variable Toggle
Test to see if the script correctly toggles between isSwitchOn = false and isSwitchOn = true when the player interacts with the switch.
In the OnTriggerInteracted function, after the isSwitchOn = not isSwitchOn statement, type:
print(isSwitchOn)
printtells the script to print to the Event Log window.-
isSwitchOnis the variable that will be printing. -
Open up the Event Log window from the Window menu in the top bar.
- Keep this open and press Play.
- Press F to interact with the switch.
The OnTriggerInteracted function should look like:
local function OnTriggerInteracted()
    isSwitchOn = not isSwitchOn
    print(isSwitchOn)

    Switch:RotateTo(ROTATION_ON, TIME_ROTATE, true)
    Light.visibility = Visibility.INHERIT
end
The Event Log should print true or false every time you interact with the light switch. You can delete the print statement now.
Create an If Statement
Now the script needs to know what to do specifically when the switch is on, and when it is not. An if statement will let you write code based on the state of other variables.
In the OnTriggerInteracted function, after the lightIsOn = not lightIsOn statement, type:
    if isSwitchOn then

    end
ifstatements are handy when you need a certain series of actions to happen when a certain set of conditions is true.isSwitchOnis the condition that must be met in order to execute the script inside our if statement.thensignifies the start of the code that will be performed if the conditions of theifstatement are met.endtells the script theifstatement is over.
Place the Switch:RotateTo() statement and the Light.visibility statement inside the if statement.
Your OnTriggerInteracted() function should now look like this:
function OnTriggerInteracted()
    -- Saves a way for the script to look up of the switch is currently on or off
    isSwitchOn = not isSwitchOn

    if isSwitchOn then
        Switch:RotateTo(ROTATION_ON, TIME_ROTATE, true)
        Light.visibility = Visibility.INHERIT
    end
end
Test the If-Statement
Press Play and make sure everything still works.
A light should have turned on the first time you interacted with the switch and then nothing happens in the future.
Turn the Switch Back Off
The next step is to tell the script to turn the switch downwards when the light is off. The else keyword will allow you code what should happen if isSwitchOn is not true.
Fortunately, you have already saved a variable for the rotation of the switch, ROTATION_OFF. Add this line after right before the end line in the if statement of the OnTriggerInteracted function:
    else
        Switch:RotateTo(ROTATION_OFF, TIME_ROTATE, true)
elseis used withifto tell the script if the if conditions are not true, do the following instead.
Your OnTriggerInteracted() function should now look like this:
function OnTriggerInteracted()
    -- Saves a way for the script to look up of the switch is currently on or off
    isSwitchOn = not isSwitchOn

    if isSwitchOn then
        Switch:RotateTo(ROTATION_ON, TIME_ROTATE, true)
        Light.visibility = Visibility.INHERIT
    else
        Switch:RotateTo(ROTATION_OFF, TIME_ROTATE, true)
    end
end
Press Play to see if your else statement works. The switch should now rotate up when first interacted with, then down on your second interaction with it. However, you still need to turn off the light when the light switch is turned off.
Turning the Light Off
Your next project goal is to make the switch more functional and have it turn on a light when players interact with it.
In the OnTriggerInteracted() in the else statement under the RotateTo() function, add:
Light.visibility = Visibility.FORCE_OFF
FORCE_OFFmakes the light completely invisible, such as if you were to turn off a light in real life.
The OnTriggerInteracted function should look like:
-- Function to flip the switch and turn the light on/off
function OnTriggerInteracted()
    -- Saves a way for the script to look up of the switch is currently on or off
    isSwitchOn = not isSwitchOn

    if isSwitchOn then
        -- Rotate the switch up and turn on the light
        Switch:RotateTo(ROTATION_ON, TIME_ROTATE, true)
        Light.visibility = Visibility.INHERIT
    else
        -- Rotate the switch down and turn off the light
        Switch:RotateTo(ROTATION_OFF, TIME_ROTATE, true)
        Light.visibility = Visibility.FORCE_OFF
    end
end
Notice the comments describing the OnTriggerInteracted() function. If statements are an excellent place for comments, because they allow you to describe the logic of what should happen, before anyone even looks at the code.
Test Turning off the Light
Save and press Play to test the latest changes. The lightbulb should illuminate when the switch is up, and be dark when the switch is down.
Updating Interaction Labels
Right now, the light switch trigger always says "Turn On". You can add more polish to a project by changing the interaction label based on what it should do each time.
There are two ways to change a trigger's label:
- You can do it by going to the trigger's Properties and editing the Interaction Label field.
- You could also do it with a script.
For the purposes of this tutorial, you will be doing it with the script as it needs to be dynamic.
Test Changing Interaction Labels
Before the Trigger.interactedEvent line, add this:
Trigger.interactionLabel = "Turn On"
Triggeris the name of the trigger you are editing the label of.interactionLabelis the property of the trigger you are editing.=is an assignment, meaning you are setting a property to what comes afterwards."Turn On"is a text string, basically what the label will say.
Test the Label Change
Press Play and check label changed from Turn on Light to Turn off Light as soon as the scene loads.
You can remove that now and add it as a part of the OnTriggerInteracted() function.
Create Constant Variables for the Interaction Labels
Now it is time to create variables for the text you will use when changing the interaction label of the trigger each time the Trigger is interacted with.
Add these to the list of constants:
local LABEL_WHEN_ON = "Turn Off"
local LABEL_WHEN_OFF = "Turn On"
Assign the Interaction Labels When a Player Interacts With the Trigger
Now, let's add these assignments to the OnTriggerInteracted() function.
Inside the if isSwitchOn then section, add:
Trigger.interactionLabel = LABEL_WHEN_ON
The OnTriggerInteracted function should look like:
-- Function to flip the switch and turn the light on/off
function OnTriggerInteracted()
    -- Saves a way for the script to look up of the switch is currently on or off
    isSwitchOn = not isSwitchOn

    if isSwitchOn then
        -- Rotate the switch up, turn on the light, and set interaction label
        Switch:RotateTo(ROTATION_ON, TIME_ROTATE, true)
        Light.visibility = Visibility.INHERIT
        Trigger.interactionLabel = LABEL_WHEN_ON
    else
        -- Rotate the switch down, turn off the light, and set interaction label
        Switch:RotateTo(ROTATION_OFF, TIME_ROTATE, true)
        Light.visibility = Visibility.FORCE_OFF
        Trigger.interactionLabel = LABEL_WHEN_OFF
    end
end
Changing If/Else to Functions
Our OnTriggerInteracted function is beginning to get a little long and may be confusing to edit in the future. An easy and quick way to clean up this code is to create two more functions for our if/else statements and move the corresponding code to inside them.
First, let's create a function called TurnOn and move the lines of code within the if statement into it.
-- Function to rotate the switch up, turn on the light, and set interaction label
function TurnOn()
    Switch:RotateTo(ROTATION_ON, TIME_ROTATE, true)
    Light.visibility = Visibility.INHERIT
    Trigger.interactionLabel = LABEL_WHEN_ON
end
Next you will create a function called TurnOff and move the lines of code withing the else statement into it.
-- Function to rotate the switch down, turn off the light, and set interaction label
function TurnOff()
    Switch:RotateTo(ROTATION_OFF, TIME_ROTATE, true)
    Light.visibility = Visibility.FORCE_OFF
    Trigger.interactionLabel = LABEL_WHEN_OFF
end
Now, you can replace the lines of code in our OnTriggerInteracted with these new functions.
-- Function to flip the switch and turn the light on/off
function OnTriggerInteracted()
    -- Saves a way for the script to look up of the switch is currently on or off
    isSwitchOn = not isSwitchOn

    -- Turns on or off the switch/light based on cached state
    if isSwitchOn then
        TurnOn()
    else
        TurnOff()
    end
end
Summary
You have now learned how a script can move and interact with objects within your scene using triggers and custom properties. You have also use programming structures like variables, functions, and if statements. Now you can start designing and coding interactions for your own games.
Finished Script
-- References used when interacting with the scene objects
local Switch = script:GetCustomProperty("Switch"):WaitForObject()
local Light = script:GetCustomProperty("Light"):WaitForObject()
local Trigger = script:GetCustomProperty("Trigger"):WaitForObject()

-- Constants used when interacting with the scene objects.
local ROTATION_ON = Rotation.New(0, -60, 0)
local ROTATION_OFF = Rotation.New(0, -130, 0)
local TIME_ROTATE = 0.1
local LABEL_WHEN_ON = "Turn Off"
local LABEL_WHEN_OFF = "Turn On"

-- Cached state of if the switch is on or off
local isSwitchOn = false

-- Function to rotate the switch up, turn on the light, and set interaction label
function TurnOn()
    Switch:RotateTo(ROTATION_ON, TIME_ROTATE, true)
    Light.visibility = Visibility.INHERIT
    Trigger.interactionLabel = LABEL_WHEN_ON
end

-- Function to rotate the switch down, turn off the light, and set interaction label
function TurnOff()
    Switch:RotateTo(ROTATION_OFF, TIME_ROTATE, true)
    Light.visibility = Visibility.FORCE_OFF
    Trigger.interactionLabel = LABEL_WHEN_OFF
end

-- Function to flip the switch and turn the light on/off
function OnTriggerInteracted()
    -- Saves a way for the script to look up of the switch is currently on or off
    isSwitchOn = not isSwitchOn

    -- Turns on or off the switch/light based on cached state
    if isSwitchOn then
        TurnOn()
    else
        TurnOff()
    end
end

-- Connect the function to the trigger interacted event
Trigger.interactedEvent:Connect(OnTriggerInteracted)
Learn More
Scripting in Core | Core API | Intro to Lua Course | Rotation API | Trigger API

