Touch API Basics
Overview
In this tutorial, you will learn the basics of using touch events by responding to the player's input when they touch their screen. You will be creating a mini-game that requires the player to drag gems into a bag to get points to increase their score. There is no end goal to the game, but the screen will get filled up if you are not fast enough.
- Completion Time: ~30 minutes
- Knowledge Level: Having basic Lua know will help, but is not required.
- Skills you will learn:
- Listening for button events
- Finding UI Controls based on the pointer position
- Getting the player's current input type
- Checking the notch size using the safe area rectangle
- Disabling virtual controls
- Dragging and dropping items
Create UI
In this section, you will create some UI that will be needed for the game.
Create Client Context
All UI needs to be placed into a Client Context folder. This is because anything the player sees in the UI, such as text, and images is usually representing information just for them. For example, the amount of ammo in a gun.
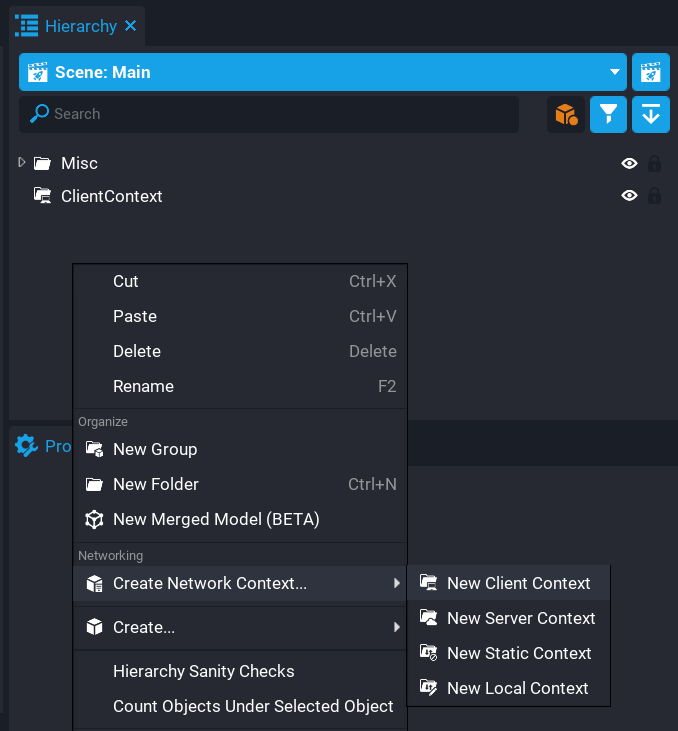
Create a Client Context by right-clicking in the Hierarchy window and selecting New Client Context from the Create Network Context menu.
Create UI Container
A UI Container is like a canvas for a painting, in this case, the paint would be placing other UI objects (for example, an image) onto the UI Container.
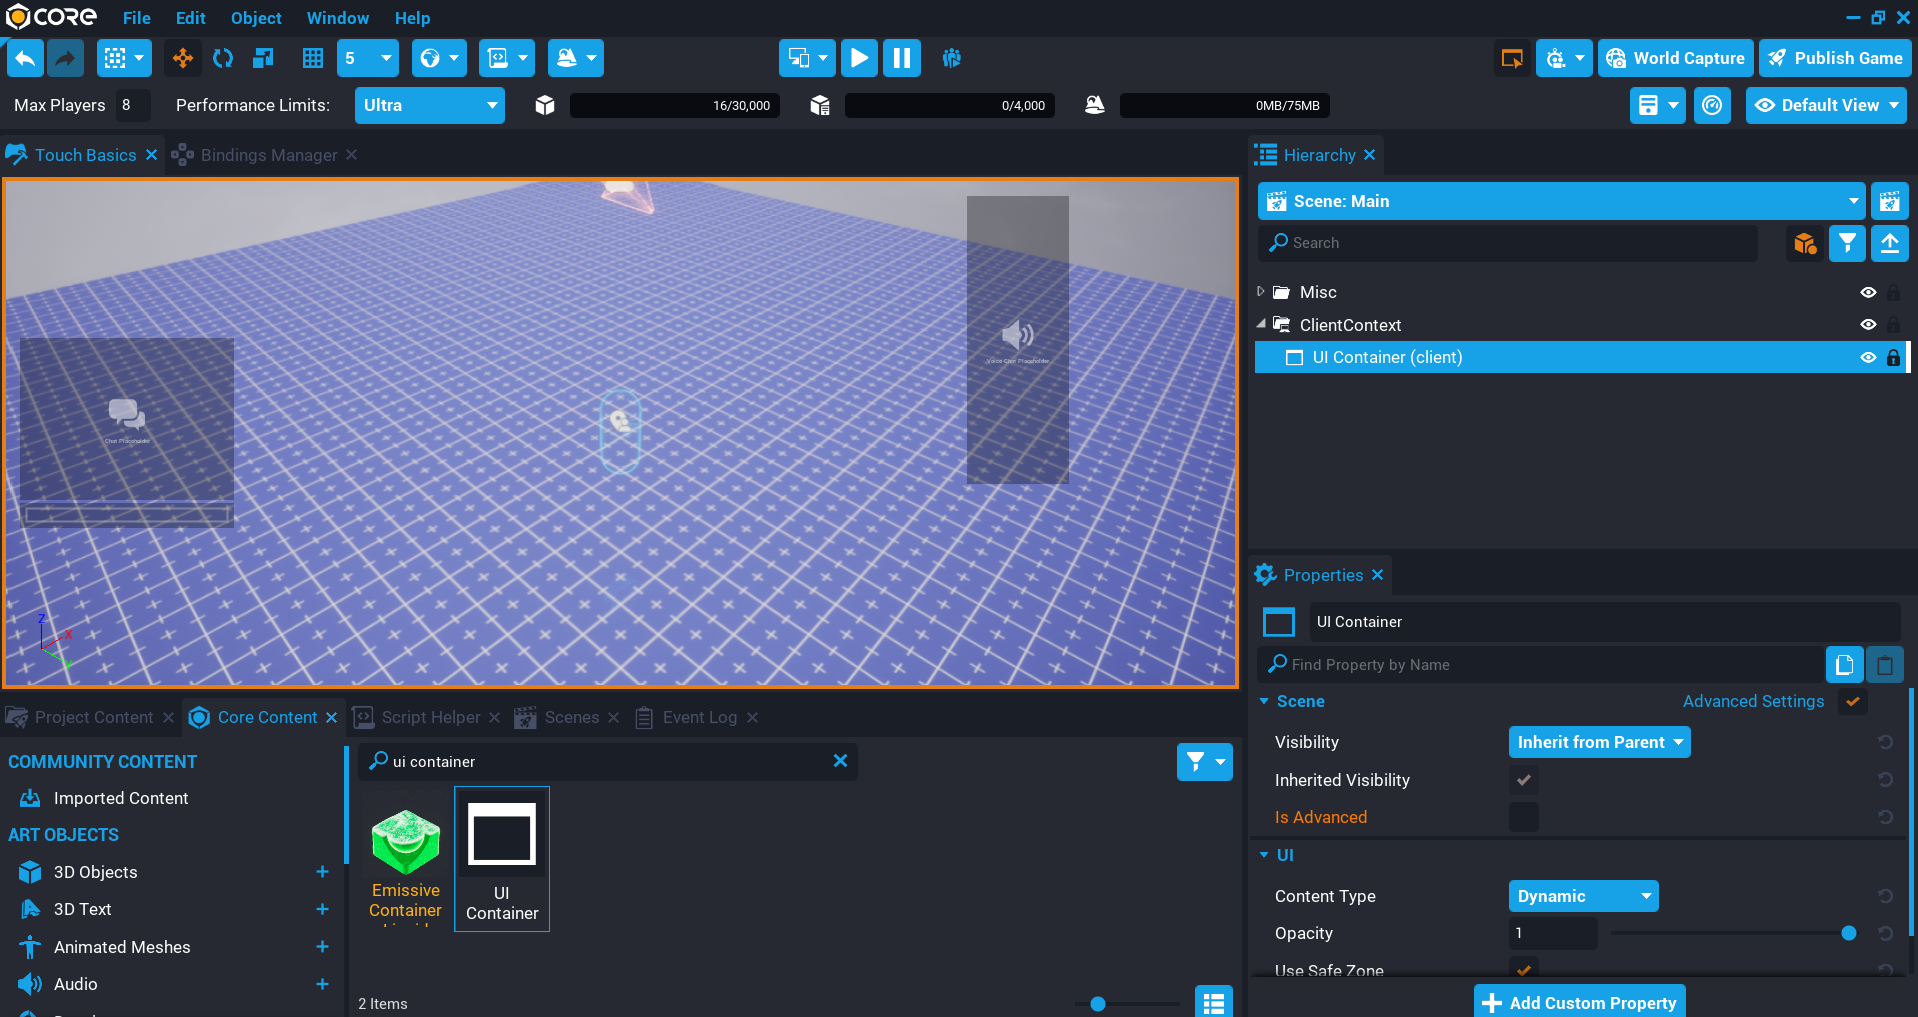
- In the Core Content window, search for
ui containerto find the UI Container object. - Add the UI Container object inside the Client Context in the Hierarchy.
Create Icon Button Template
To drag around an item on the screen you need to make it a button so events can be connected to listen for when the button has been pressed or released. Because multiple icons will be spawned on the screen, creating a reusable template and changing the image property when it is spawned means you only need one template.
- Add a UI Button object to the Hierarchy by searching for
ui buttonin Core Content. - Rename the button to
Icon Button. - Set the Width and Height to
150in the Properties window. - Set the Anchor and Dock to Middle Center in the Properties window.
- Right-click on the Icon Button and select New Template from Object
- Delete the Icon Button from the Hierarchy window.
Create Bag Image
The item that will be dragged around the screen will be dropped onto a bag image and then removed from the screen. This will also reward some points to the player.
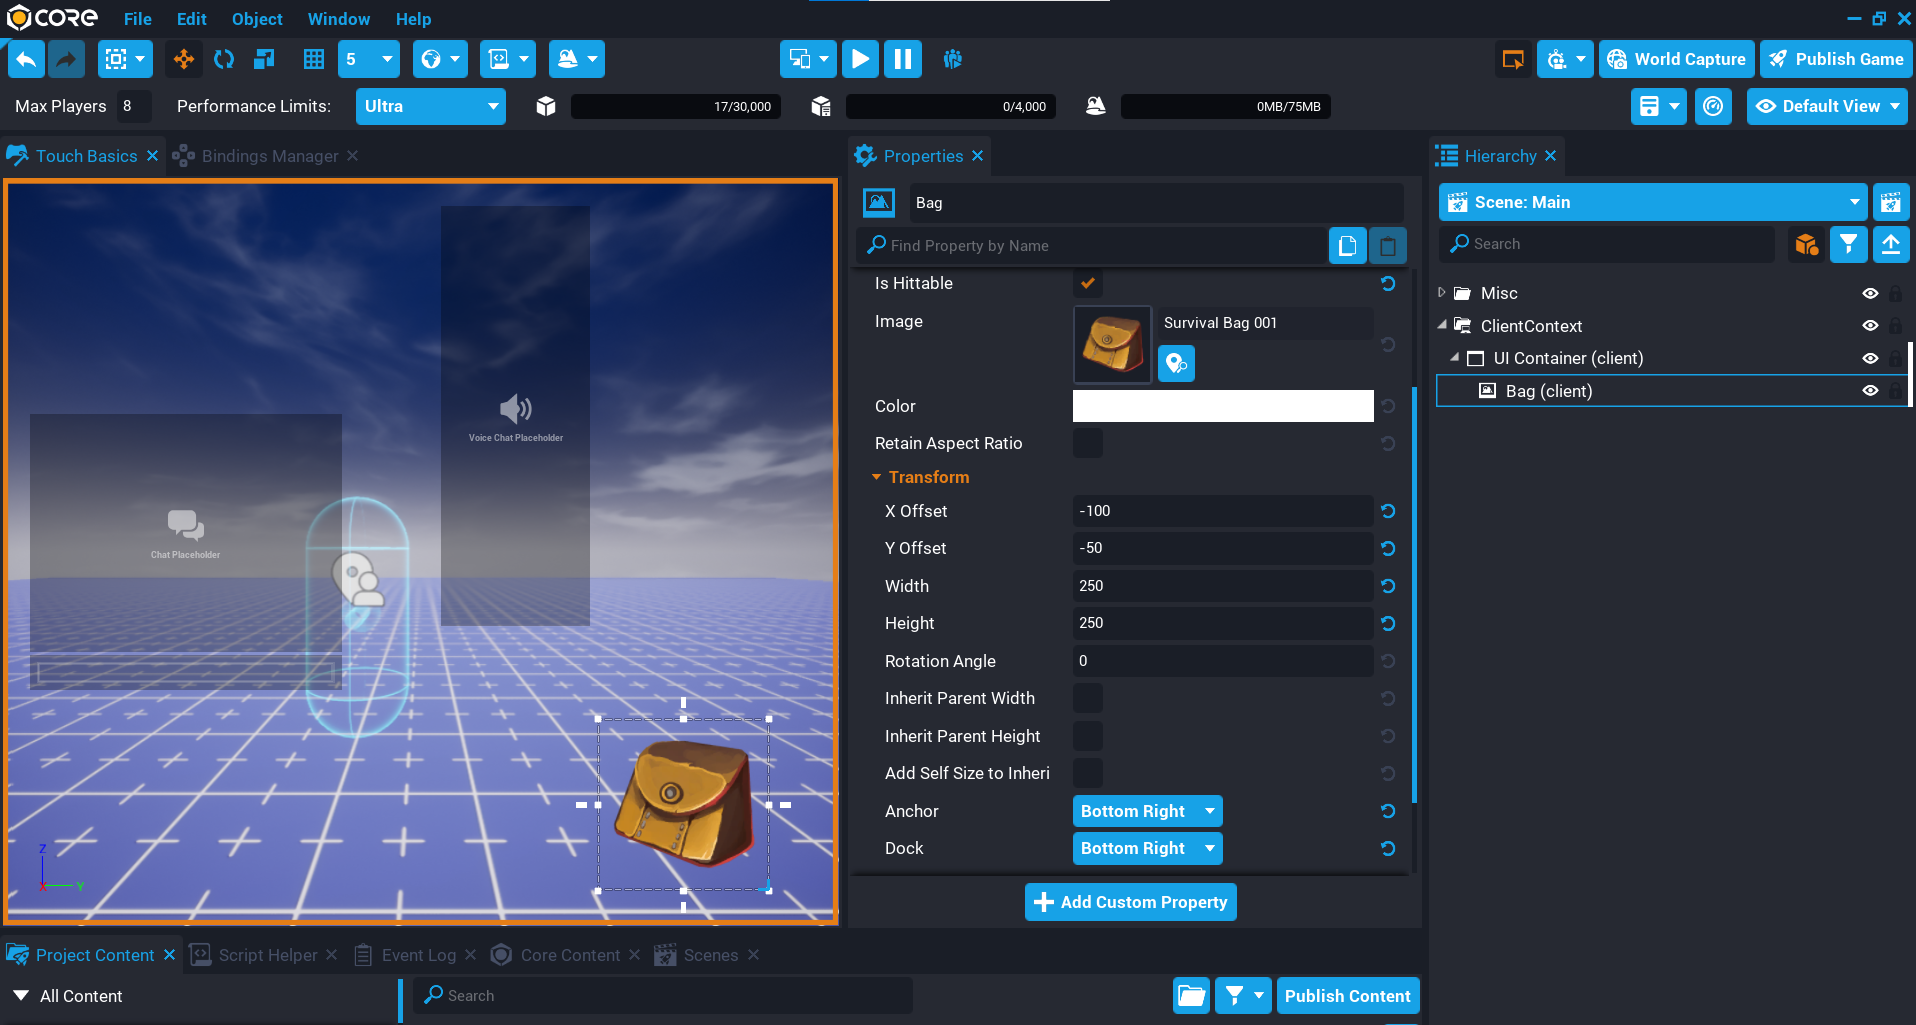
The bag image will have the property Is Hittable enabled so the pointer can interact with it.
- Add a UI Image object as a child of the UI Container in the Hierarchy.
- Rename the UI Image to
Bag. - Enable Is Hittable in the Properties window.
- Set the X Offset to
-100and Y Offset to-50in the Properties window. - Set the Width and Height to
250in the Properties window. - Set the Anchor and Dock to Bottom Right in the Properties window.
Create Score Text
To show the current score to the player a text object can be added just below the bag. The score will increase when the player drops gems onto the bag.
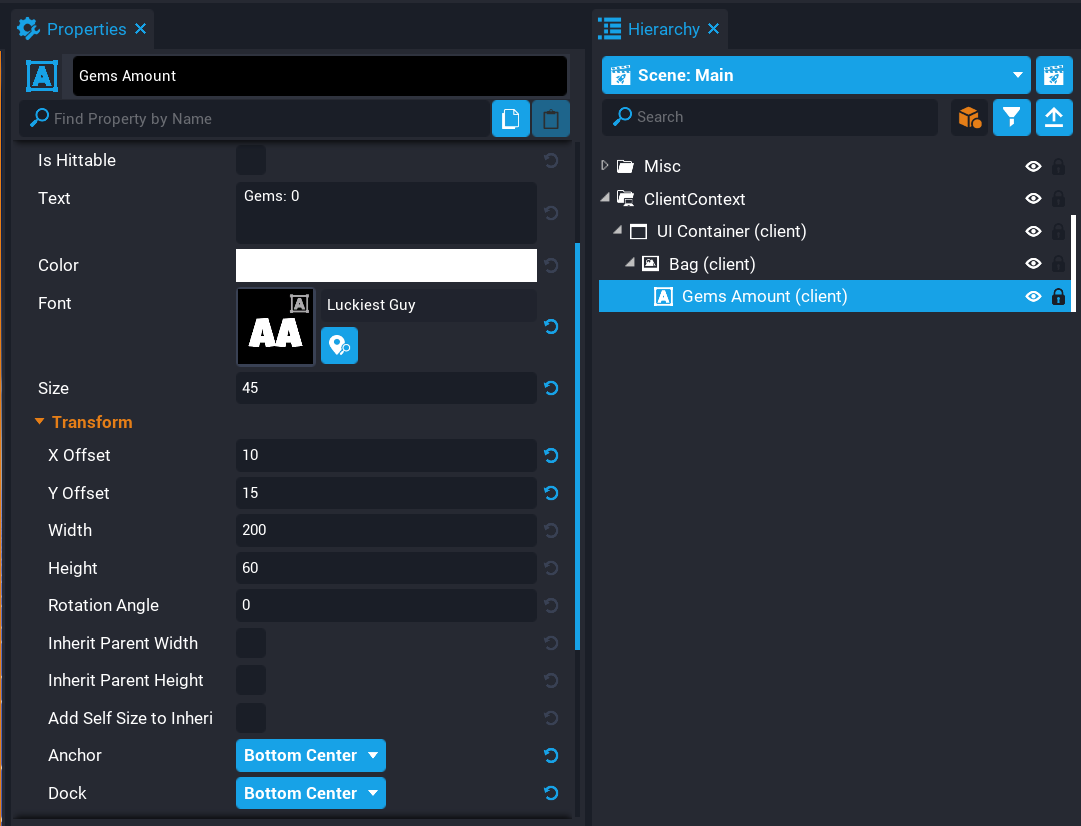
- Add a UI Text object as a child of the Bag object in the Hierarchy.
- Rename the UI Text to
Gems Amountin the Properties window. - Set the Text property to
Gems: 0in the Properties window. - Set the Font property to Luckiest Guy in the Properties window.
- Set the Size to
45in the Properties window. - Set the X Offset to
10in the Properties window. - Set the Y Offset to
15in the Properties window. - Set the Anchor and Dock to Bottom Middle in the Properties window.
- Set the Horizontal Justification and Vertical Justification to Center in the Properties window.
- Uncheck Wrap Text in the Properties window.
- Set the Outline to
4in the Properties window.
Add Audio
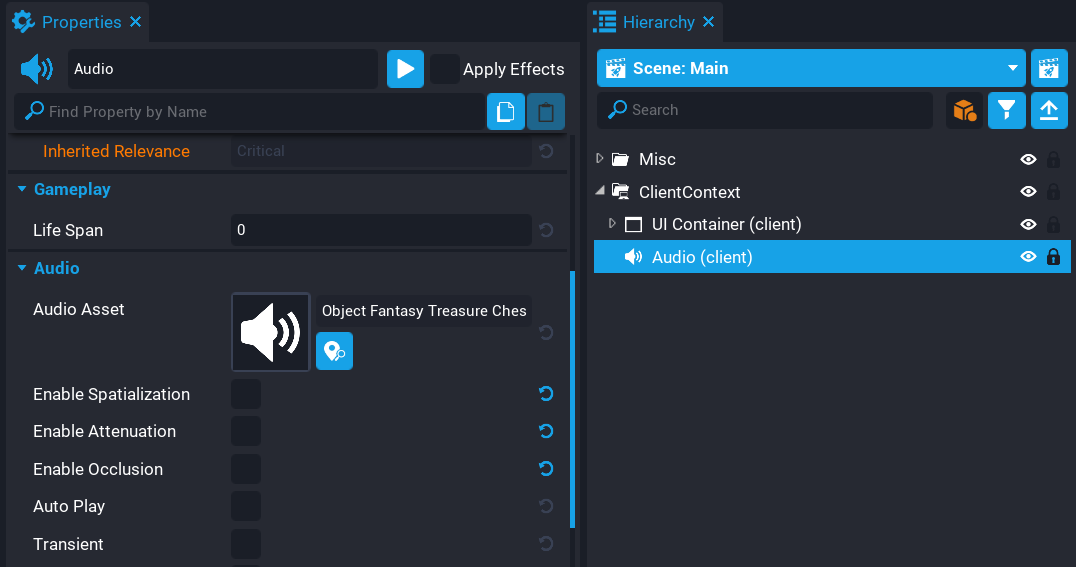
When the icon is dropped onto the Bag an audio effect needs to be played for the player.
- In Core Content search for
fantasy dropto find Object Fantasy Treasure Chest Drop 01 SFX and add it to the Client Context in the Hierarchy. - Rename the audio object to
Audio. - Uncheck Enable Spatialization, Enable Attenuation, and Enable Occlusion in the Properties window.
Create Icons Data Table
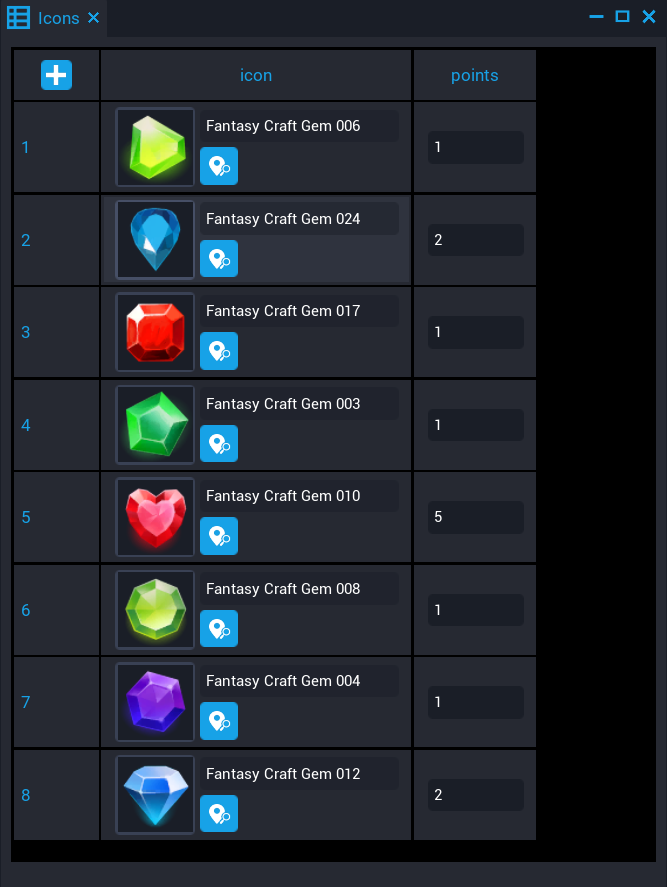
A data table can be used that will contain the images and the score for each one. When the Icon Button template is spawned the image will be changed by selecting a random one from data table.
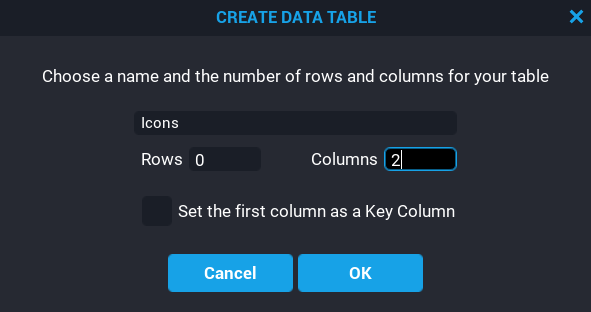
- In My Tables folder in the Project Content window, right-click and select Create Data Table.
- Name the data table
Iconsand enter2for the number of Columns to create.
Set Column Type
Open up the Icons data table to set up the column name and type. To edit a column, click on the warning icon.
- For the first column, set the Column Name to
iconand the Column Type to Asset Reference. - For the second column, set the Column Name to
pointsand the Column Type to Int.
Add Rows
Add as many rows as you need. Select an image for the icon and enter the points amount that will be awarded for putting that icon in the bag.
Create TouchDragClient Script
Create a new script called TouchDragClient and add it to the Client Context in the Hierarchy.
Add Custom Properties
The TouchDragClient script will need custom properties added for the template, UI objects, and the Icons data table.
- Add the Icons data table from My Tables in Project Content as a custom property called
Icons. - Add the Icon Button from My Templates in Project Content as a custom property called
IconButton. - Add the UI Container as a custom property called
Container. - Add the Bag image as a custom property called
Bag. - Add the Gems Amount text as a custom property called
GemsAmount. - Add the Audio as a custom property called
Audio.
Edit Script
Open up the TouchDragClient script and add the variables for the custom properties that were added. These variables will contain a reference to each of the custom properties and will allow you to use them throughout the script.
local ICONS = require(script:GetCustomProperty("Icons"))
local ICON_BUTTON = script:GetCustomProperty("IconButton")
local CONTAINER = script:GetCustomProperty("Container"):WaitForObject()
local BAG = script:GetCustomProperty("Bag"):WaitForObject()
local GEMS_AMOUNT = script:GetCustomProperty("GemsAmount"):WaitForObject()
local AUDIO = script:GetCustomProperty("Audio"):WaitForObject()
Create Variables
You will need to initialize a few variables that will be used throughout the script.
local draggedIcon = nil
local lastPosition = nil
local amount = 0
local task = nil
| Variable | Description |
|---|---|
draggedIcon | Will hold a reference to the icon currently being dragged around on the screen. |
lastPosition | Will track the last position of the icon being dragged around on the screen. |
amount | The total points for this session. |
task | A reference to the task that will be spawned later on in the script. |
Create OnPressed Function
Create a function called OnPressed. This function will be called when the pointer is pressed on an icon button. For example, if the player touches the screen with their finger and an icon button is at the location of the touch then it will fire the pressedEvent event and the OnPressed function will be called.
The draggedIcon variable is set to the button that is pressed. At the same time, the isHittable property on the button is disabled. This will allow other controls to be found under the icon.
local function OnPressed(button)
    draggedIcon = button
    button.isHittable = false
end
Create OnReleased Function
Create a function called OnReleased. This function will be called when the releasedEvent event has fired when releasing the pointer. For example, if the player lifts their finger it will fire the event.
The draggedIcon variable is set to nil as the player is no longer dragging an icon around on the screen.
When the event is fired, the function will try to find a control at the lastPosition. The lastPosition is updated constantly when an icon is dragged around on the screen. Any UI Control that has the property Is Hittable enabled can be found using the FindControlAtPosition function. This is useful to see what is below the pointer.
If the control matches the BAG, then points are awarded, the button is destroyed, and the audio is played. The pitch of the audio is randomized to give it a slightly different sound each time.
If the player releases the pointer, then the isHittable property needs to be set to true so that it can be picked up and dragged around again.
local function OnReleased(button, points)
    draggedIcon = nil

    local control = UI.FindControlAtPosition(lastPosition)

    if control == BAG then
        amount = amount + points
        GEMS_AMOUNT.text = string.format("Gems: %s", amount)
        button:Destroy()

        AUDIO.pitch = math.random(-100, 600)
        AUDIO:Play()
    else
        button.isHittable = true
    end
end
Create SpawnIcon Function
Create a function called SpawnIcon. This function will spawn a new icon only if nothing is currently being dragged around on the screen. This could be a game mechanic to give the player time to plan. Maybe the icons can be matched when they are added to the bag to increase the score.
An icon is randomly picked from the ICONS data table and given some random position and rotation.
The pressedEvent and releasedEvent are used as they will work on Mobile and PC.
If a Task has been spawned, then the repeatInterval property is set to a random value between 0 and 1 using math.random.
local function SpawnIcon()
    if draggedIcon ~= nil then
        return
    end

    local icon = World.SpawnAsset(ICON_BUTTON, { parent = CONTAINER })
    local row = ICONS[math.random(#ICONS)]

    icon:SetImage(row.icon)

    icon.x = math.random(-800, 800)
    icon.y = math.random(-400, 400)
    icon.rotationAngle = math.random(360)

    icon.pressedEvent:Connect(OnPressed)
    icon.releasedEvent:Connect(OnReleased, row.points)

    if task ~= nil then
        task.repeatInterval = math.random()
    end
end
Create Tick Function
Create a function called Tick. This function will run every frame. If the draggedIcon is valid, then it will set the absolute position of the icon using SetAbsolutePosition.
If the current input type is TOUCH, then you will need to offset the dragged icon either left or right based on the notch position. To do this, you can get the safe area rectangle using GetSafeArea. If the left value of the rectangle is greater than 0, then the notch is on the left side of the screen, so the x position can be shifted to the right by half of the left value. A similar thing can be done for the right side, but the right value needs to be subtracted from the screen width.
function Tick()
    if Object.IsValid(draggedIcon) then
        lastPosition = Input.GetPointerPosition()

        if lastPosition ~= nil then
            if Input.GetCurrentInputType() == InputType.TOUCH then
                local safeArea = UI.GetSafeArea()
                local screenSize = UI.GetScreenSize()

                if safeArea.left > 0 then
                    lastPosition.x = lastPosition.x + (safeArea.left / 2)
                elseif safeArea.right < screenSize.x then
                    lastPosition.x = lastPosition.x + ((screenSize.x - safeArea.right) / 2)
                end
            end

            draggedIcon:SetAbsolutePosition(lastPosition)
        end
    end
end
Enable Cursor for Keyboard/Mouse
For this to work on PC as well, you will need to enable the cursor so it is visible and can interact with the UI.
UI.SetCanCursorInteractWithUI(true)
UI.SetCursorVisible(true)
Disable Virtual Controls for Mobile
For this type of game, disabling the virtual controls makes sense. This will make it easier to move the icons around on the screen using a touch device. You can disable and enable the virtual controls using DisableVirtualControls and EnableVirtualControls.
Input.DisableVirtualControls()
Spawn Repeating Task
A Task needs to be spawned that will spawn an icon every so often. The repeatCount is set to -1 so it repeats forever, and the repeatInterval is initially set to .6 but will be random after each spawn. This is the duration between each icon spawning.
task = Task.Spawn(SpawnIcon)

task.repeatCount = -1
task.repeatInterval = .6
The TouchDragClient Script
TouchDragClient
local ICONS = require(script:GetCustomProperty("Icons"))
local ICON_BUTTON = script:GetCustomProperty("IconButton")
local CONTAINER = script:GetCustomProperty("Container"):WaitForObject()
local BAG = script:GetCustomProperty("Bag"):WaitForObject()
local GEMS_AMOUNT = script:GetCustomProperty("GemsAmount"):WaitForObject()
local AUDIO = script:GetCustomProperty("Audio"):WaitForObject()

local draggedIcon = nil
local lastPosition = nil
local amount = 0
local task = nil

local function OnPressed(button)
    draggedIcon = button
    button.isHittable = false
end

local function OnReleased(button, points)
    draggedIcon = nil

    local control = UI.FindControlAtPosition(lastPosition)

    if control == BAG then
        amount = amount + points
        GEMS_AMOUNT.text = string.format("Gems: %s", amount)
        button:Destroy()

        AUDIO.pitch = math.random(-100, 600)
        AUDIO:Play()
    else
        button.isHittable = true
    end
end

local function SpawnIcon()
    if draggedIcon ~= nil then
        return
    end

    local icon = World.SpawnAsset(ICON_BUTTON, { parent = CONTAINER })
    local row = ICONS[math.random(#ICONS)]

    icon:SetImage(row.icon)

    icon.x = math.random(-800, 800)
    icon.y = math.random(-400, 400)
    icon.rotationAngle = math.random(360)

    icon.pressedEvent:Connect(OnPressed)
    icon.releasedEvent:Connect(OnReleased, row.points)

    if task ~= nil then
        task.repeatInterval = math.random()
    end
end

function Tick()
    if Object.IsValid(draggedIcon) then
        lastPosition = Input.GetPointerPosition()

        if lastPosition ~= nil then
            if Input.GetCurrentInputType() == InputType.TOUCH then
                local safeArea = UI.GetSafeArea()
                local screenSize = UI.GetScreenSize()

                if safeArea.left > 0 then
                    lastPosition.x = lastPosition.x + (safeArea.left / 2)
                elseif safeArea.right < screenSize.x then
                    lastPosition.x = lastPosition.x + ((screenSize.x - safeArea.right) / 2)
                end
            end

            draggedIcon:SetAbsolutePosition(lastPosition)
        end
    end
end

UI.SetCanCursorInteractWithUI(true)
UI.SetCursorVisible(true)

Input.DisableVirtualControls()

task = Task.Spawn(SpawnIcon)

task.repeatCount = -1
task.repeatInterval = .6
Test the Game
Test the game to make sure the icons can be dragged into the bag and the score increases. Make sure to test using Keyboard/Mouse input, and touch input. You can enable the device preview to test touch controls.
Summary
Even with this basic tutorial, you easily come up with a few fun games using similar controls. Have a look at existing games that use a drag and drop mechanic and see if you can improve this game. There is a lot more of the API to explore that will give you far more options.
Learn More
Input API | UI API | Device Preview Reference | Custom Properties Reference | UI Reference | Converting to Mobile Tutorial | Device Aware UI Tutorial
