Pet Namer
Overview
The UI Text Entry Box is a new UI component that allows players to enter text without using the chat window. This tutorial will show how to create a UI prompt allowing the player to rename a pet spider object. The player will also greet the pet using its given name.
- Completion Time: ~15 minutes
- Knowledge Level: Basic Lua Understanding
- Skills you will learn:
- Design a simple UI prompt.
- Detect if the player enters text into the Text Entry Box.
- Detect if a player enters a trigger.
- Display Fly Up Text above the player's head.
Scene Objects
The first step will be to add all the necessary objects to the scene and put them in place.
Add a Pet
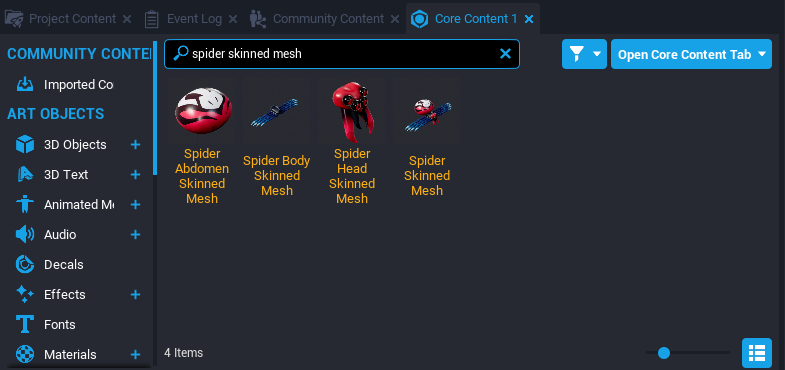
Open the Core Content window and search for spider skinned mesh. Then drag and drop the Spider Skinned Mesh into the scene.
Add a Trigger
From the Core Content window, drag and drop a Trigger object into the scene. Change the position and scale of the trigger to surround the spider mesh.
Create a Client Context
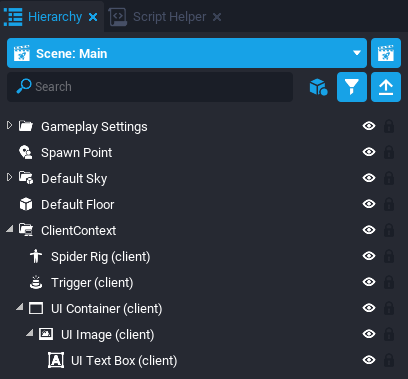
In the Hierarchy, select both the Trigger and Spider Rig objects. Right click and select the Create Network Context followed by Create Client Context Containing These.
The UI Prompt
The UI prompt will simply have a text prompting the player to type a new name for the pet and a text entry box for the player to click and type inside.
Create a UI Container
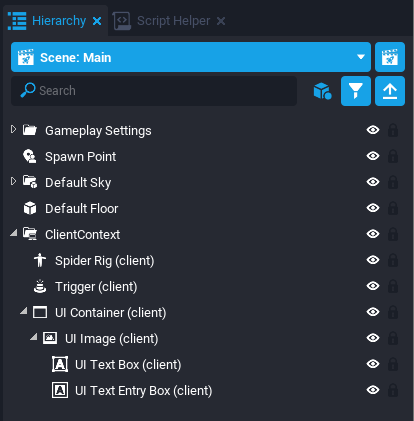
From the Core Content window, drag and drop a UI Container into the Hierarchy. Make it a child of the Client Context group.
Create a UI Image
From the Core Content window, drag and drop a UI Image into the Hierarchy. Make it a child of the UI Container.
Change Image Properties
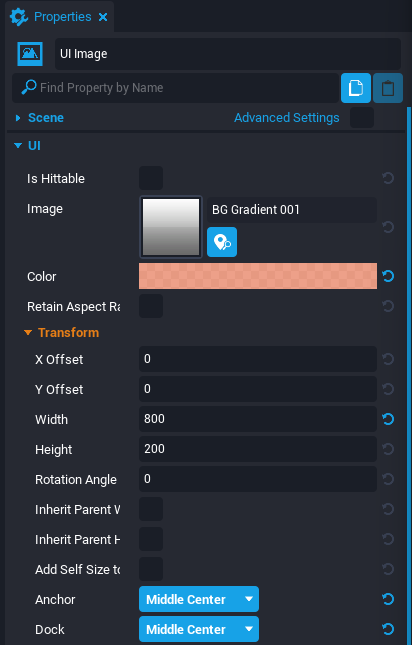
This image will be the background for the UI prompt so it should be centered and big enough for text. Select the UI Image object in the Hierarchy and open the Properties window.
Change the following properties:
- Set the Image property to BG Gradient 001.
- Set the Color property to any desired color.
- Set the Width property to
800. - Set the Height property to
200. - Set the Anchor and Dock property to Middle Center.
Create a UI Text Box
From the Core Content window, drag and drop a UI Text Box into the Hierarchy. Make it a child of the UI Image.
Change Text Box Properties
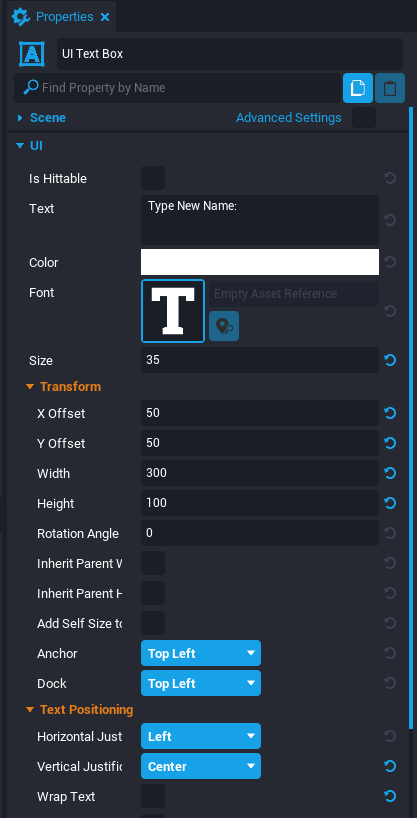
Select the UI Text Box in the Hierarchy and open the Properties window. Change the following properties:
- Set the Text property to
Type New Name:. - Set the Size property to
35. - Set the X Offset and Y Offset property to
50. - Set the Width property to
300. - Set the Height property to
100. - Set the Vertical Justification property to Center.
- Disable the Wrap Text property.
Create a UI Text Entry Box
From the Core Content window, drag and drop a UI Text Entry Box into the Hierarchy. Make it a child of the UI Image.
Change Text Entry Box Properties
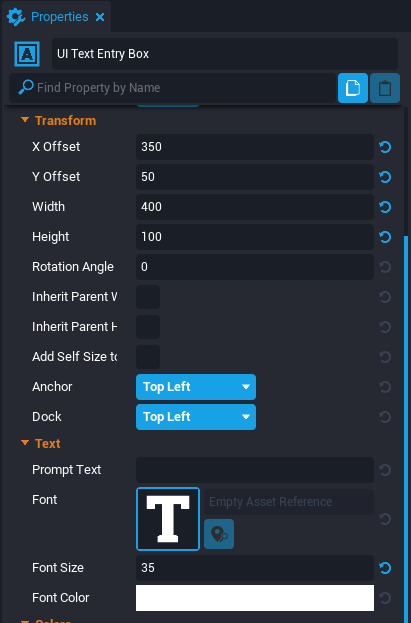
Select the UI Text Entry Box in the Hierarchy and open the Properties window. Change the following properties:
- Set the X Offset property to
350. - Set the Y Offset property to
50. - Set the Width property to
400. - Set the Height property to
100. - Set the Font Size property to
35.
The Pet Namer Script
The UI prompt and scene are all ready now. The last part is to script the functionality of the player being able to interact with the trigger to display the UI prompt and change the spider's name with the entered text.
Create a New Script
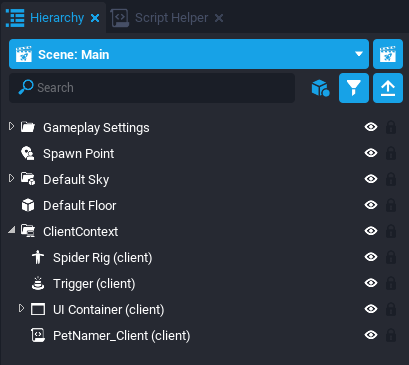
Create a new script named PetNamer_Client and add it as a child of the Client Context group.
Add Custom Property References
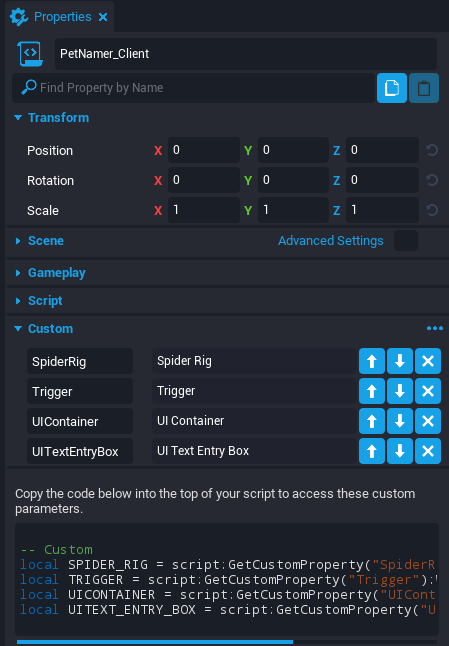
The script will need references to many different objects in the scene. Select the PetNamer_Client script and open the Properties window.
Drag and drop the following objects as a custom property to the PetNamer_Client script:
- Spider Rig
- Trigger
- UI Container
- UI Text Entry Box
Add the Code
Double click the PetNamer_Client script to open the Script Editor window.
Create Reference Variables
This can be copied from the Properties window of the script. Is used to reference the necessary objects.
local SPIDER_RIG = script:GetCustomProperty("SpiderRig"):WaitForObject()
local TRIGGER = script:GetCustomProperty("Trigger"):WaitForObject()
local UICONTAINER = script:GetCustomProperty("UIContainer"):WaitForObject()
local UITEXT_ENTRY_BOX = script:GetCustomProperty("UITextEntryBox"):WaitForObject()
Create Local Player Variable
To ensure the local player is the player checking interaction with the trigger, there will need to be a reference of the local player.
local localPlayer = Game.GetLocalPlayer()
Create a Talk Function
The player will be greeting the spider pet as it enters and exits the trigger. This Talk function will make it easy to pass in a message and display it above the player using the UI.ShowFlyUpText function.
local function Talk(message)
    local textPos = localPlayer:GetWorldPosition() + Vector3.UP * 150
    UI.ShowFlyUpText(message, textPos, {
        isBig = true,
        duration = 1
    })
end
Create a Toggle UI Function
The UI prompt will be displayed and hidden based on the player's interaction with the trigger. The ToggleUI function will be able to toggle the UI prompt on and off based on the boolean parameter isVisible. It will also control the mouse visibility and trigger's interaction prompt.
local function ToggleUI(isVisible)
    UICONTAINER.visibility = isVisible and Visibility.FORCE_ON or Visibility.FORCE_OFF
    UI.SetCursorVisible(isVisible)
    UI.SetCanCursorInteractWithUI(isVisible)
    TRIGGER.isInteractable = not isVisible
end
Create the Event Handler Functions
The Trigger has events for greeting the pet when the player enters and exits the trigger. It also displays the UI prompt when the trigger is interacted and closes the UI prompt if the player exits the trigger.
The textCommittedEvent occurs when the UI Text Entry Box is clicked off or if the player presses Enter with the text entry box selected. The committed text will replace the spider pet's name and close the UI prompt.
local function OnBeginOverlap(trigger, other)
    if other:IsA("Player") and other == localPlayer then
        Talk("Hello " .. SPIDER_RIG.name)
    end
end

local function OnEndOverlap(trigger, other)
    if other:IsA("Player") and other == localPlayer then
        Talk("Goodbye " .. SPIDER_RIG.name)
        ToggleUI(false)
    end
end

local function OnInteracted(trigger, other)
    if other:IsA("Player") and other == localPlayer then
        ToggleUI(true)
    end
end

local function OnTextCommitted(object, text)
    SPIDER_RIG.name = text
    ToggleUI(false)
end
Connect Events to Handler Functions
Connect the Trigger's events and UI Text Entry Box's event to their appropriate handler functions.
TRIGGER.beginOverlapEvent:Connect(OnBeginOverlap)
TRIGGER.endOverlapEvent:Connect(OnEndOverlap)
TRIGGER.interactedEvent:Connect(OnInteracted)
UITEXT_ENTRY_BOX.textCommittedEvent:Connect(OnTextCommitted)
Add Initial Code
The UI prompt should be invisible at the start and the interaction label of the trigger needs to be set up.
ToggleUI(false)
TRIGGER.interactionLabel = "Change Name"
The Full PetNamer_Client Script
PetNamer_Client
    local SPIDER_RIG = script:GetCustomProperty("SpiderRig"):WaitForObject()
    local TRIGGER = script:GetCustomProperty("Trigger"):WaitForObject()
    local UICONTAINER = script:GetCustomProperty("UIContainer"):WaitForObject()
    local UITEXT_ENTRY_BOX = script:GetCustomProperty("UITextEntryBox"):WaitForObject()

    local localPlayer = Game.GetLocalPlayer()

    local function Talk(message)
        local textPos = localPlayer:GetWorldPosition() + Vector3.UP * 150
        UI.ShowFlyUpText(message, textPos, {
            isBig = true,
            duration = 1
        })
    end

    local function ToggleUI(isVisible)
        UICONTAINER.visibility = isVisible and Visibility.FORCE_ON or Visibility.FORCE_OFF
        UI.SetCursorVisible(isVisible)
        UI.SetCanCursorInteractWithUI(isVisible)
        TRIGGER.isInteractable = not isVisible
    end

    local function OnBeginOverlap(trigger, other)
        if other:IsA("Player") and other == localPlayer then
            Talk("Hello " .. SPIDER_RIG.name)
        end
    end

    local function OnEndOverlap(trigger, other)
        if other:IsA("Player") and other == localPlayer then
            Talk("Goodbye " .. SPIDER_RIG.name)
            ToggleUI(false)
        end
    end

    local function OnInteracted(trigger, other)
        if other:IsA("Player") and other == localPlayer then
            ToggleUI(true)
        end
    end

    local function OnTextCommitted(object, text)
        SPIDER_RIG.name = text
        ToggleUI(false)
    end

    TRIGGER.beginOverlapEvent:Connect(OnBeginOverlap)
    TRIGGER.endOverlapEvent:Connect(OnEndOverlap)
    TRIGGER.interactedEvent:Connect(OnInteracted)
    UITEXT_ENTRY_BOX.textCommittedEvent:Connect(OnTextCommitted)

    ToggleUI(false)
    TRIGGER.interactionLabel = "Change Name"
Test the Code
Save the script and preview the project. The player should be able to interact with the trigger and rename the pet using the UI prompt.
Summary
The UI Text Entry Box is a really exciting tool. It allows creators to not rely on the Chat Box as the only method of inputting text. This opens the door to having searchable inventories, auto complete tools, and many other capabilities.
Learn More
UI Text Entry Validation Tutorial | UI Text Entry Box Reference | UI Text Entry Box API |
